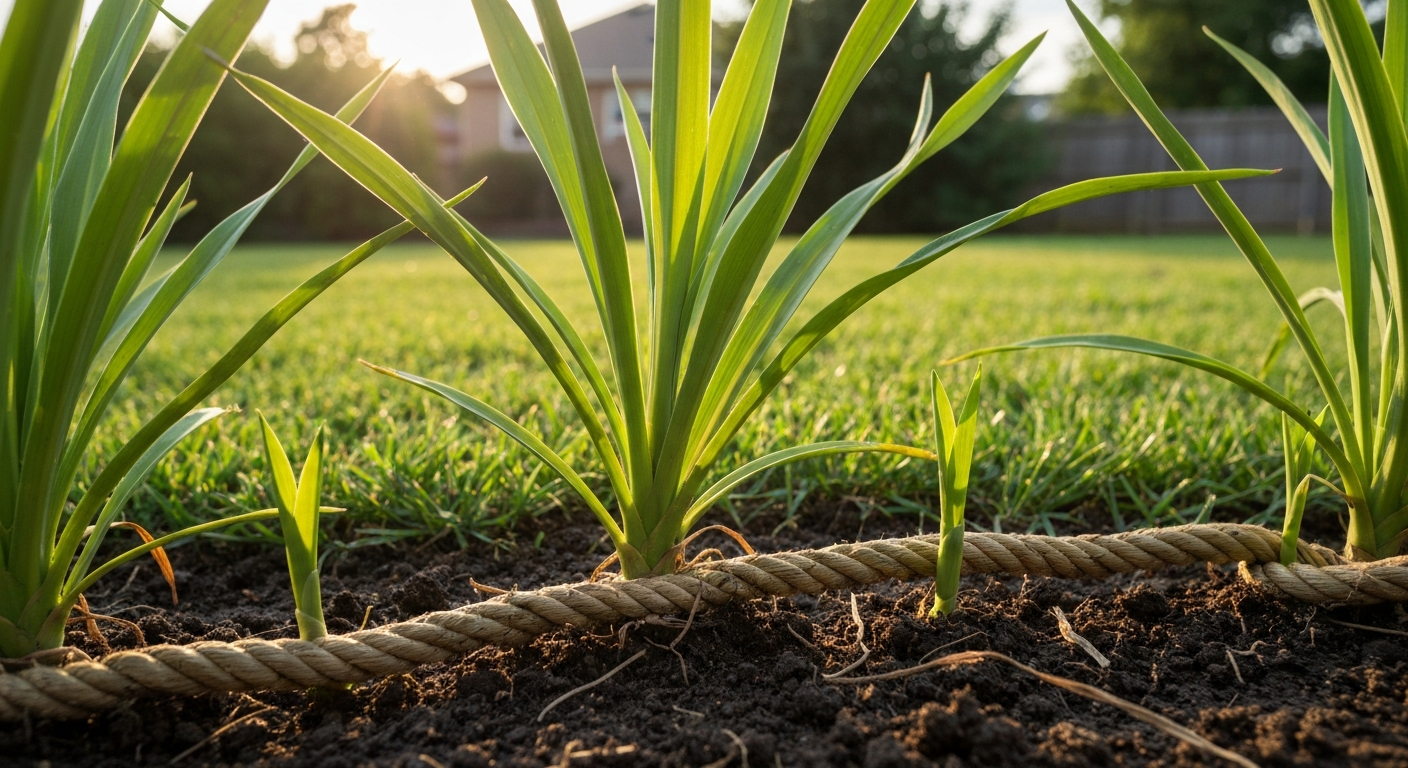
St. Augustine grass (Stenotaphrum secundatum) grows by sending out above-ground runners called stolons. Each stolon creeps outward from the plant, and at every node along that runner, the grass can push down new roots and send up new leaf shoots. That's the whole mechanism: no underground rhizomes doing the heavy lifting, just a dense network of surface runners racing across the soil. Once you understand that, everything else about planting, mowing, watering, and troubleshooting a St. Augustine lawn starts to make much more sense.
How Does St Augustine Grow: Guide to Establishing Lawns & Care

Marcus Weir
9 Aug 2026
What St. Augustine grass actually is
St. Augustine is a warm-season, perennial turfgrass native to tropical and subtropical coastal regions, think Gulf Coast Florida, the Caribbean, and West Africa. It's the dominant lawn grass across much of the southeastern United States, from Texas to the Carolinas, largely because it handles heat, humidity, and partial shade better than most of its warm-season competitors like bermudagrass. You'll recognize it by its coarse, flat, rounded leaf blades and the thick, rope-like stolons that sprawl across the surface of the lawn. This guide covers how that growth habit works biologically, what conditions bring out the best in it, how to get it established from scratch, and how to keep it healthy through the seasons.
How St. Augustine actually grows
Stolons, nodes, and why there are no rhizomes
The key to understanding St. Augustine's growth is the stolon, which is essentially a horizontal stem that runs along the soil surface rather than underground. Every few inches, that stolon has a node, a small joint packed with meristematic (actively dividing) cells. Given adequate warmth, moisture, and light, each node will sprout a cluster of upright leaf shoots and push roots down into the soil beneath it. Within a few weeks, that node becomes a self-sustaining plant. The original stolon keeps growing, creating more nodes, and the process repeats, which is exactly why St. Augustine can fill in bare patches surprisingly fast during the warm season.
Unlike bermudagrass, St. Augustine does not produce true rhizomes (underground stems). That distinction matters practically: bermudagrass can regenerate from below-ground tissue after heavy damage, while St. Augustine is entirely dependent on its above-ground stolons. Damage the stolons, with heavy foot traffic, a dull mower blade, or a severe pest infestation, and recovery is slower. The upside is that St. Augustine doesn't invade flowerbeds from underground the way bermuda does.
Root structure and seasonal growth pulses
The root system stays relatively shallow. Most roots are concentrated in the upper 12 inches of soil, though under favorable conditions they can reach beyond 27 inches. Research by DiPaola, Beard, and Brawand (1982) documented that St. Augustine root growth follows seasonal pulses, ramping up during warm months and slowing significantly once soil temperatures drop. Interestingly, some root growth can continue even after the shoots have gone dormant in cooler weather, the roots are slightly more cold-tolerant than the visible top growth. This is worth remembering in fall: the lawn may look tired before the roots actually stop working.
The seasonal growth cycle
St. Augustine is actively growing from roughly late spring through early fall, with peak growth during the hottest months when soil temperatures stay consistently above 65°F. Growth slows as temperatures drop in October and November and goes dormant once air temperatures stay below about 50°F for extended periods. In South Florida and similar climates, St. Augustine may stay green year-round. Along the northern edge of its range, roughly the upper edge of USDA Zone 8, expect visible leaf browning (called leaf firing) in winter. The grass is not dead; it's waiting. New stolon growth resumes in spring once temperatures climb back up.
What St. Augustine needs to thrive
Climate and zone suitability
St. Augustine is best adapted to USDA Hardiness Zones 8 through 11, warm, humid, coastal, and subtropical climates. For examples of crops that thrive in comparable subtropical, coastal climates, see what do they grow in Tenerife. See what do they grow and eat in Windward for information on local crops and diets in the Windward region. It's poorly cold-tolerant compared with zoysia or bermudagrass, which makes cultivar choice critical at the cooler end of its range. If you're in northern Florida, coastal Georgia, or the lower Gulf Coast states, cold-tolerant cultivars like Raleigh or Palmetto give you a meaningful buffer against winter damage. If you're significantly north of Zone 8, consider a different warm-season grass entirely. Attempting St. Augustine outside its adapted zones results in recurring winter kill, which is an expensive and frustrating cycle.
Sun and shade tolerance
One of St. Augustine's genuine advantages over other warm-season grasses is shade tolerance. While it prefers full sun (6 or more hours per day), it can persist with as little as 4 to 6 hours of direct light, depending on the cultivar. Palmetto, Seville, and Bitterblue are the standout shade performers. Standard Floratam, the most widely planted cultivar in Florida, needs more sun and will thin out noticeably under heavy tree canopy. As a general rule, if a spot gets less than 4 hours of direct sun, no turfgrass will give you a dense, healthy lawn and you'd be better off with a shade-tolerant ground cover.
Soil type, pH, and drainage
St. Augustine is adaptable across many soil types, including the sandy soils common in coastal areas, but it performs best in well-drained soils with a pH between roughly 5.5 and 7.5. UF/IFAS sod production guidance targets a pH of about 6.5 to 7.0 for optimal nutrient availability. For a home lawn, a soil test before planting is not optional, it's the single most practical thing you can do. State and university extension labs will test your soil for around $10 to $20 and provide specific lime or sulfur amendments to hit the right range. Guessing at pH and applying lime or fertilizer blindly leads to nutrient lockout, wasted money, and a lawn that struggles no matter how well you water and mow. For island-specific guidance on crops, soil, and microclimates, see our guide on what do they grow in Gran Canaria.
Water requirements
St. Augustine has moderate to moderately high water needs. During active growth, it generally requires about 1 inch of water per week through rainfall or irrigation, though actual needs vary by season, soil type, and local evapotranspiration rates. UF/IFAS irrigation planning models use a rooting depth of 8 to 12 inches as the baseline for scheduling. The most practical sign that your lawn needs water is the visual wilt test: when the grass turns a blue-gray tint and leaf blades fold lengthwise, irrigation is overdue but not yet too late. Overwatering is equally damaging, promoting shallow roots, fungal disease, and thatch buildup.
Planting options: sod, plugs, sprigs, and why seed isn't on the list
St. Augustine is propagated vegetatively. There is no widely available commercial seed for home lawn establishment. Occasional viable seed does appear in some cultivars, but seed-based establishment is not a practical or endorsed method. Your real options are sod, plugs, and sprigs, each with a different cost, labor, and time-to-coverage profile. For historical context on colonial-era plantings, see what did Mission Santa Barbara grow.
| Method | Coverage speed | Cost (relative) | Labor | Best for |
|---|---|---|---|---|
| Sod | Immediate visual cover; rooted in 14–21 days | Highest | Moderate (installation) | Full lawn installs, erosion-prone areas, fastest results |
| Plugs | Weeks to months depending on spacing | Medium | High (planting each plug) | Smaller areas, budget-conscious patching, DIY fills |
| Sprigs | Several weeks to a few months | Lower | High (spreading, raking in) | Large areas on a budget, renovation projects |
Sod gives you the fastest result and the most erosion protection, but it's the most expensive option per square foot. Plugs (small sections of sod, typically 2 to 4 inches square) are spaced 6 to 24 inches apart; the closer the spacing, the faster the fill-in. Sprigs are individual stolons or small pieces of plant material spread across prepared soil, either broadcast (about 1 bushel per 1,000 square feet) or placed in furrows 6 to 12 inches apart and covered lightly. My honest recommendation: for a full lawn from scratch, sod is worth the extra cost if your budget allows. Plugs make sense for patching or small areas. Sprigs are labor-intensive and slower, but viable for large renovations where cost matters most.
Step-by-step: establishing a St. Augustine lawn
Site preparation
Good establishment starts weeks before the first piece of sod hits the ground. Kill or remove existing vegetation, either mechanically or with a non-selective herbicide, following the label carefully and waiting the recommended interval before planting. Grade the area to direct water away from structures, aiming for a 1 to 2 percent slope. Get your soil test done, amend pH if needed, and till amendments into the top 4 to 6 inches. Rake the surface smooth and firm, removing rocks, debris, and clumps. The goal is a firm, even seedbed with no large air pockets under the sod or plugs.
Planting timing
Plant St. Augustine during its active growing season: late spring through early summer is ideal in most of its range. Soil temperatures should be consistently at or above 65°F. Planting in the heat of midsummer works but demands more attentive irrigation. Fall planting is risky because the grass won't have enough time to establish a deep root system before the first cold snap. Never plant during dormancy. In central and south Florida, the planting window is wider and essentially runs from spring through early fall.
Planting technique
- Lightly moisten (don't saturate) the prepared soil surface immediately before laying sod or planting plugs.
- For sod: lay pieces in a staggered brick pattern, butting edges tightly together with no gaps. Roll the sod after installation with a lawn roller to ensure full soil contact.
- For plugs: use a plug tool or hand trowel to create holes at your chosen spacing (6 inches for faster fill, up to 24 inches if budget is the priority). Place one plug per hole, firm the soil around it, and water in immediately.
- For sprigs: broadcast or place in furrows, cover lightly with soil or top-dressing so the nodes have contact with the ground but the leaf tissue isn't buried, then firm down and water.
- Apply a light top-dressing of weed-free soil or sand over sprigs if broadcasting, to improve node-to-soil contact.
Immediate post-plant care: the critical first 6 to 12 weeks
This is where most establishment failures happen, either from under-watering in the first two weeks or from over-fertilizing too early. The UF/IFAS protocol is specific and worth following closely. For the first 7 to 10 days, irrigate in multiple short cycles (5 to 10 minutes each), several times per day, to keep the soil surface consistently moist without waterlogging. Days 7 to 10 through day 20, shift to one irrigation per day applying about a quarter to half an inch. After that, move to 2 to 3 times per week at the same depth until the lawn is established. Sod roots peg into the soil in roughly 14 to 21 days (you can test by gently tugging a corner). Hold off on any fertilizer for 30 to 60 days after planting, the root system isn't ready to use it, and early fertilization pushes top growth at the expense of rooting.
How to propagate St. Augustine yourself
If you already have an established St. Augustine lawn or can source a small quantity of plant material, you can propagate your own plugs and sprigs rather than buying everything. I've done this multiple times when patching bare spots after heavy traffic damage, it's straightforward once you know what you're looking for.
Dividing sod into plugs
- Identify a dense, healthy section of existing lawn with no obvious pest or disease issues.
- Use a sharp spade or sod cutter to lift squares or rectangles of sod, cutting to a depth of about 2 to 3 inches to include the root zone.
- Cut the sod pieces into smaller plug-sized sections, roughly 2 to 4 inches square, ensuring each piece has at least one healthy node and some root material.
- Plant immediately — plugs dry out quickly. If you can't plant the same day, store them in a shaded area and keep the roots moist with a damp cloth or plastic sheet.
- Plant using the plug method described above, firm well, and irrigate immediately.
Making and using sprigs
- Collect stolons from a healthy area of lawn by pulling or cutting them from the soil, keeping nodes intact.
- Strip away any damaged or dead tissue. Each viable sprig should have at least 2 to 3 nodes and show green, living tissue.
- Plant sprigs the same day they're collected. Place them in prepared furrows about 6 to 12 inches apart, pressing nodes into soil contact. Alternatively, broadcast across the prepared area at roughly 1 bushel per 1,000 square feet.
- Cover nodes lightly with loose soil or a thin top-dressing to improve contact, then firm down gently.
- Irrigate immediately and follow the same establishment watering schedule as new sod.
Encouraging rooting in newly planted material
Rooting success comes down to node-to-soil contact and consistent moisture. The nodes will not root if they're sitting on top of loose, dry soil. After planting, press down any material that has shifted, and if you see stolons lifting off the surface in the first week, pin them back down with wire staples or simply press them in with your foot. Keep foot traffic off new plantings for at least 3 weeks. The first visible sign of successful rooting is new vertical leaf growth from the nodes, which typically appears within 7 to 14 days under warm conditions.
Routine lawn care: mowing, watering, and fertilizing
Mowing heights and frequency
Mowing height depends on your cultivar. UF/IFAS recommendations are specific: Floratam should be mowed at 3.5 to 4.0 inches; Palmetto at 3.0 to 4.0 inches; Seville (a dwarf type) at 2.0 to 2.5 inches; CitraBlue at 2.0 to 3.0 inches. Never remove more than one-third of the leaf blade in a single mowing, this is the most commonly broken rule in lawn care, and it causes real stress to the plant. During the peak growing season (June through August in most of the range), you may need to mow every 5 to 7 days. In spring and fall, once every 10 to 14 days is often sufficient. Always use a sharp mower blade. NC State Extension guidance (Carolina Athletic Fields) recommends keeping mower blades sharp to avoid tearing, not removing more than one-third of the leaf per mow, and returning clippings unless thatch or seed buildup is a concern Carolina Athletic Fields / NC State Extension (mowing and blade care guidance). A dull blade tears rather than cuts the grass, leaving ragged ends that turn brown and create entry points for disease. I resharpen my blades every 8 to 10 hours of mowing time.
Irrigation scheduling
Once established, St. Augustine should be watered infrequently but deeply, ideally applying about half an inch to three-quarters of an inch per irrigation event, enough to wet the top 8 to 12 inches of soil. Water when you see wilt signs (blue-gray color, folded blades, footprints remaining in the turf) rather than on a rigid daily schedule. Overwatering promotes fungal disease, thatch, and shallow roots. In practice, established lawns in Florida often need irrigation 1 to 3 times per week in summer and much less in winter. Use a rainfall gauge or simply set out a flat-bottomed can when you run your sprinklers to measure how much you're actually applying.
Fertilization timing and rates
Fertilize St. Augustine only during active growth, never in late fall or winter when the grass is dormant or slowing down. UF/IFAS regional nitrogen guidelines give a practical starting point: North Florida lawns need roughly 2 to 4 pounds of nitrogen per 1,000 square feet per year; Central Florida, 2 to 5 pounds; South Florida, 4 to 6 pounds. Split this total into multiple applications rather than dumping it all at once. As a general rule, don't apply more than 1 pound of soluble nitrogen per 1,000 square feet in a single application (slow-release products allow somewhat higher single applications under certain rules). Excessive nitrogen increases disease pressure and nitrate leaching, and it won't make your lawn greener indefinitely, it makes the grass grow faster than it can support. Always base your fertilizer choices on a soil test rather than guessing.
Seasonal maintenance: what to do and when
Spring (March through May)
Spring is your most important maintenance window. As the lawn breaks dormancy and soil temperatures climb above 65°F, begin mowing again at the correct height for your cultivar. Scout for winter damage: thin patches, brown areas that aren't greening up, and any signs of pests or disease that overwintered. This is the right time to do soil testing if you haven't done one recently. Apply the first nitrogen fertilizer of the season once the lawn is actively growing and showing good green color, not before. For a first-year lawn (installed the previous spring or summer), keep the first-year nitrogen rates conservative and focus more on irrigation consistency.
Summer (June through August)
Peak growing season. Mow frequently (every 5 to 7 days for most cultivars), keep blades sharp, and water based on wilt signs rather than calendar. Apply the bulk of your annual nitrogen during this period, split into applications at least 6 to 8 weeks apart. Watch for signs of chinch bugs (yellow to brown patches expanding in hot, dry areas, especially along pavement edges), gray leaf spot (during prolonged wet periods), and take-all root rot. For a first-year lawn, focus on uniform irrigation and avoid stressing the new turf with heavy fertilization or foot traffic until the lawn is fully knit together.
Fall (September through November)
Taper off fertilization as growth slows. The last nitrogen application in North and Central Florida should generally be by early September; in South Florida, you have a longer window. Gradually reduce irrigation frequency as temperatures drop and evapotranspiration slows. Leaf pickup matters in fall, heavy leaf cover on St. Augustine blocks light and invites fungal issues. If you have bare patches from summer damage, fall in South Florida is still a viable time for plug or sod repair, but in North Florida, patching is better left until spring to avoid newly planted material getting hit by cold.
Winter (December through February)
Minimal activity for the grass and for you. Do not fertilize a dormant or semi-dormant St. Augustine lawn. Irrigate only if there are extended dry periods (more than 3 to 4 weeks without rain), applying just enough to prevent desiccation. Mowing frequency drops dramatically, once a month or less in most cases. Use the dormant period to service your mower, sharpen blades, and plan any spring renovations. In frost-prone areas, a late-season freeze may cause additional leaf browning on top of natural dormancy, but this is cosmetic on an otherwise healthy lawn; the stolons survive moderate freezes. Severe or prolonged freezes can kill stolons, particularly in northern zones, which is why cultivar selection matters so much at the cold edge of St. Augustine's range.
Cultivar quick-reference
| Cultivar | Mowing height | Shade tolerance | Cold tolerance | Key notes |
|---|---|---|---|---|
| Floratam | 3.5–4.0 in. | Lower (needs more sun) | Poor | Vigorous, coarse; historically chinch-bug resistant; most common in Florida |
| Palmetto | 3.0–4.0 in. | Good | Better than Floratam | Good all-around choice for shadier or cooler sites |
| Raleigh | 3.5–4.0 in. | Moderate | Best cold tolerance | NCSU release; good for Zone 8 upper range; more disease-susceptible |
| Seville | 2.0–2.5 in. | Good | Moderate | Dwarf type; finer texture; requires lower mowing |
| CitraBlue | 2.0–3.0 in. | Good | Moderate | Newer release; improved color; slower lateral growth |
Common myths and quick troubleshooting
A few persistent myths make St. Augustine harder to manage than it needs to be. The biggest one: "more fertilizer means faster, greener grass." In reality, excess nitrogen increases disease pressure and pushes growth faster than the root system can support, leading to thatch buildup and a weakened lawn. Another common myth is that St. Augustine spreads underground like bermudagrass. It doesn't. All spread is via above-ground stolons, which means heavy thatch or debris on the soil surface can physically block new stolon rooting.
- Yellow patches in hot, dry areas near pavement: check for chinch bugs — part the grass at the edge of the yellow zone and look for tiny black-and-white insects at the soil surface.
- Gray, water-soaked circular spots on blades during wet weather: likely gray leaf spot, a fungal disease aggravated by excess nitrogen and overwatering. Reduce nitrogen and improve drainage.
- Lawn not rooting after sod installation: check for poor soil contact (air pockets under the sod) or dry soil; roll again and irrigate more frequently in short cycles.
- Lawn thinning in shade: reassess the sunlight — if it's under 4 hours, even shade-tolerant cultivars will struggle. Consider Palmetto or Seville, or switch to a ground cover.
- Slow fill-in from plugs: spacing was too wide, or planting was done too late in the season. Plugs planted in summer with 6-inch spacing will fill in within a season; 24-inch spacing can take two seasons.
- Brown dormant lawn not greening in spring: be patient until soil temperatures consistently hit 65°F. If patches still don't green by late spring, test those areas for stolon survival by gently scratching — live stolons are green inside.
FAQ
What is the basic growth habit of St. Augustine grass (Stenotaphrum secundatum)?
St. Augustine spreads primarily by above‑ground stolons (runners). Stolons have nodes that actively divide to produce new shoots and roots, allowing the turf to spread laterally. It has relatively shallow, fibrous roots concentrated in the upper soil profile (most activity in the top ~8–12 inches), though roots can extend deeper under some conditions. Because it lacks true rhizomes and seed is rarely used, most establishment is vegetative (sod, plugs, sprigs). (Sources: UF/IFAS, peer literature.)
Why is St. Augustine usually planted vegetatively rather than from seed?
Commercial seed for St. Augustine is not widely available or reliable; most cultivars are propagated vegetatively. Vegetative methods (sod, plugs, sprigs) preserve cultivar traits and give predictable, uniform stands. Seeded establishment is uncommon and not recommended for typical lawns. (Source: UF/IFAS extension guidance.)
What are the common planting options and how do I choose among sod, plugs and sprigs?
- Sod: fastest way to immediate cover and erosion control; best when you need quick use and uniform appearance. Roots typically ‘peg in’ in ~14–21 days. - Plugs: turf squares or discs placed at spacings from 6–24 inches. Closer spacing fills in faster; good compromise between cost and speed. - Sprigs: stolon pieces planted in furrows (6–12 in. apart) or broadcast; lower material cost but longer fill‑in time. Choose sod for speed/traffic, plugs for budget/landscaping phased installs, sprigs for lowest material cost on large areas. (Source: UF/IFAS.)
Step‑by‑step: how do I establish St. Augustine from sod, plugs or sprigs?
1) Soil test and correct pH/nutrient issues before planting. 2) Prepare a firm, weed‑free seedbed—remove debris, grade, and improve drainage if needed. 3) For sod: lay immediately, stagger seams, roll lightly and irrigate. For plugs: space plugs per plan (closer = faster fill), ensure soil contact. For sprigs: plant in shallow furrows or broadcast and press into soil. 4) Immediate irrigation: multiple short cycles per day (5–10 min) for 7–10 days, then once daily applying ~1/4–1/2 inch for another 7–10 days. 5) After initial rooting, reduce to 2–3 irrigations per week applying ~1/4–1/2 inch each until established. 6) Delay first routine fertilization 30–60 days after planting (sod roots faster; plugs/sprigs need longer). 7) Avoid heavy traffic until turf is well rooted and cover is continuous. (Source: UF/IFAS establishment protocol.)
What irrigation schedule and amounts should I follow during establishment and routine care?
Establishment: irrigate several short cycles per day (5–10 minutes) for the first 7–10 days to keep surface moist; then once daily applying ~1/4–1/2 inch for another 7–10 days. After turf is rooting, move to 2–3 irrigations per week, applying about 1/4–1/2 inch each time until fully established. Routine irrigation should be based on soil moisture, rooting depth (commonly using 8–12 in. in scheduling models), and evapotranspiration—use an ET‑based or soil water‑balance approach where possible. Avoid daily long irrigations; deep, infrequent watering encourages deeper roots. (Source: UF/IFAS AE482 and establishment guidance.)
What are recommended fertilization guidelines and timing for St. Augustine?
Follow a soil test first. General annual N guidelines (UF/IFAS, Florida examples) vary by region: North ~2–4 lb N/1,000 ft²/yr, Central ~2–5, South ~4–6. Do not fertilize new plantings for 30–60 days. Apply N in split applications during active growth (spring through summer) using slow‑release sources where practical to reduce leaching and disease risk. Avoid excessive N, which raises disease risk and environmental losses. Always follow local regulations and label rates. (Sources: UF/IFAS, fertilizer studies.)},{
Next Article
What Do They Grow in Gran Canaria: Crops, Gardens & Zones
What do they grow in Gran Canaria: bananas, tomatoes, potatoes, grapes, flowers, aloe vera, where, why and when toplant